Posts

Pistons of Studliness
Image
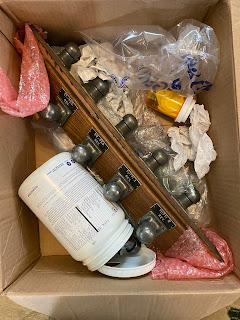
My organ console, as I received it, had 13 thumb pistons. It had been wired for 2 toe studs, but they were removed before it was sold to me.    Back in early March,  scored a set of 17 toe studs on ebay.    The pistons had the same issue as all the other wiring,  it really wanted to run at 12 volts, not 5. The toe studs are OSI standard buttons with copper contacts and worked just fine at 5 volts, so all that was going to be necessary was to install them and hook them to an arduino.   I decided to do the toes first, and think about the thumbs while I worked on it.  Here are my gently used toe studs as they arrived.  Half are on those oak rails, and half packed into that plastic bottle.  They are machined from solid metal, so nothing can really happen to them in the mail, but nice not to be rattling around loose. Inside the medicine bottle I found the screws and label plates for the loose studs.  I was hoping i'd be able to use ...

New Expressions

Image
It has been an interesting month, mostly confined to my home due to the coronavirus pandemic. I'm lucky in that my job still exists, and I can do it from home, so I've been working full time.  That does take away time from organ building and playing, but not as much as when I was commuting. Also, there is lunchtime organ practice, which vastly improves my mood for afternoon meetings. I have been reluctant to mess with my organ, and take a risk of leaving it nonfunctional since the pipe organ I play is currently inaccessible. I've been testing and experimenting on the workbench. I'm having some challenges with the darlingtons for the SAM units, and the LED strip for the pedal lights. I'm probably doing something stupid and when I look at them again, it will mysteriously work. That is what happened with my slide pot. My Klann console has 3 shoes - two for controlling shades and one crescendo, which had a sforzando button which engaged and disengaged it.  I had a r...

Timing is everything

Image
The first thing my organ teacher told me was the importance of timing. As usual, he was spot on. Week before last, I finished making the replacement piece for the bottom of the music rack. This isn't exacly a high-tech thing. I bought a piece of oak from Home Depot nearly exactly the size and shape I needed.  Cut to length and curved the outside corners, sanded stained and finished. I added a bit of moulding trip I found in the basement - the previous owner of our house did a lot of woodwork and drilled holes for the screws. tadah!  With 2 working manuals and pedals, and now a music rack at the right position, I have a functional practice organ!   There is a lot of work to do still - I have to finish the stop actions and the pistons, and add the LED strips for the pedal and music lights, install brackets and stuff to permanently mount the power supply and mac mini, and the wiring, in place.   That is all gravy, I can play it now and practice. Whi...

Unit Testing is my friend

Image
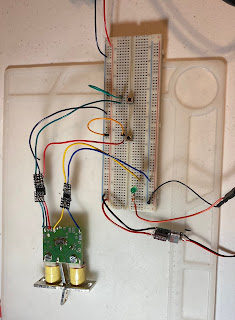
I've soldered all those wires and female headers onto my SAM units.   For once in my life, I'm going to do things the right way around and test all of them before installing them into the organ. I breadboarded a simple testing widget with male connectors matching the females on the SAM unites. The power and ground wires coming from off screen above are attached to the ASTRON SS-18 I got to power all these magnets. At the bottom is a UBEC 12v-5v converter for the LED. The circuit for the reed switch is entirely separate from the wiring for the magnets, so it can connect directly to the arduino running at a lower voltage than the magnets. I'm converting here to use just one power source, and avoid having to connect and program a microcontroller for a very simple test.  As you see, there are two little push buttons.  Push the left one and the stop flips on (down) and the green LED lights. Push the right one and it flips off (up) and the light goes out. Repeat a coup...

SAM I AM

Image
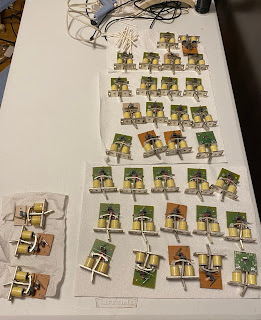
 Here they are, my gently-used Stop Action Magnet units. They were removed from a project by the previous owner and stored likely in a garage, they needed a bit of cleaning.  Now they are all ready to prepare for installation in my organ console. These are for flip tab stops. A little plastic bit with the name of the stop engraved on it gets screwed onto the little metal tab.  Pushing the tab down activates the stop and flipping it back up closes it. There is a reed switch, visible on the front side, that lets the computer figure out the current position of the stop.  It can be polled like the keyboards to discover if the organist has flipped it.   The tab can also be flipped by the computer - by activating one of thise electromagnet coils. If you push a piston button, it activates a bunch of stops in Hauptwerk. Hauptwerk can then send MIDI commands out to the console to instruct it to flip the tabs to match the current state of the virtual organ...

A Swell Day

Image
Everything proceeded according to plan in the last week.  I built the second sensor array, incorporating everything I'd learned making the first one, and installed it into the Great manual. I took the first one out and corrected the misaligned sensors (I only had to remove and replace 4 total. I was able to scootch the boards of 8 sensors back and forth to get most of the others lined up correctly.  Then I installed that array into the Swell and plopped it into the organ for testing.  A couple of rounds of correcting wires and nudging magnets and it is good to play! You can on the right side of the left photo, the Mac Mini I acquired to dedicate to this project. It is a new model quad core i3 with 16GB memory and 128GB SSD.  I know I'm going to need a ton more disk space but I'm figuring on adding an external drive.  I borrowed a monitor I use for my work laptop to get going - I'm still pondering what I will want to do for screens on a permanent basis b...

A Great proof of concept

Image
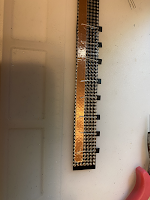
I finished building the first Hall sensor array, and after not small amount of fiddling around, figured out how to install it into the manual.  It works! So, now to back up a bit and document what I did.  I build the sensors into strips of 8 for ease of handling (and one short one of 5 because 61 keys) I bought 160 Melexis  US5881LUA-AAA-000-BU sensors from Mouser. With the front (beveled) part facing me, the left pin is power, center is ground, and the right is signal. I happened to have a roll of 1/4" copper foil tape so I figured I'd experiment with using it as ground and power bus, it doesn't take much room and can be soldered to. I put a strip on the front and back of a piece of flexible proto-board.  The flexibility wasn't especially important here, but being able to cut it easily was . The legs are a bit fragile, but I didn't break more than one or two before I got the hang of handling them. Bending them with pliers works better than fingers. I pulled ...